
Frugal fashionista: DIY holiday heels
 CREDIT: LISA KELLY
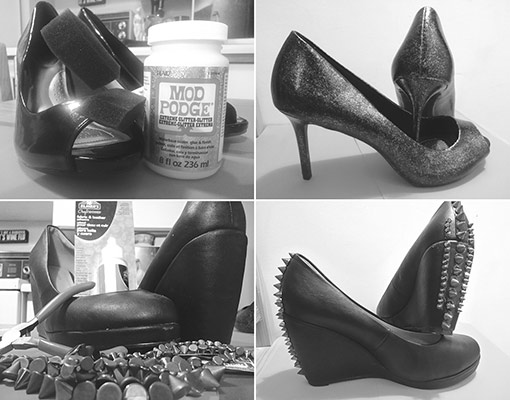
From left: Glittery heels start with glittery Modge Podge and transform into sparkly footwear. Add a bit of edge and repurpose a pair of old shoes with studs and glue.
It’s only November, and holiday parties are already being put on. For fashionistas everywhere, this can only mean one thing: holiday fashion. This is the one time of the year when you can dress as gaudy as you want, and no one can judge you.
Any fashionista knows that a holiday outfit is nothing without a great pair of holiday shoes, but forking out over $60 for a pair of sparkly shoes you’re only wearing once a year does not seem reasonable. For women with naturally wide feet, it’s often not even possible to purchase a pair of holiday heels without ordering online and paying outrageous amounts of money for shipping and duty fees.
The solution? Do it yourself.
Glitter heels
You will need:
A pair of heels (preferably black)
A foam brush $0.87
Mod Podge Extreme Glitter $11
Workspace
Total cost: $11.87
Because the shoes in this example are patent leather, they have been pre-scuffed prior to glitter application.
If you’ve spent any time on Pinterest, you’ve probably seen DIY tutorials for Mod Podge glitter heels before. In these tutorials, the heels are prepped with Mod Podge, glitter is poured over them, and they are sealed with another coat of Mod Podge. For anyone wanting to make DIY a specific colour of glitter heels, this tutorial is the way to go, however, it is pricier and messy. For an easy, no mess solution to DIY glitter heels, Mod Podge Extreme Glitter is your saviour. It’s exactly what it sounds like: sparkly Mod Podge.
Although creating these glitter heels is a relatively un-messy process, it is recommended to prep your workspace with scrap paper or newspaper beforehand, unless you want to glitter your table too.
Using your foam brush, apply the Mod Podge directly to your heels. Stick to one brush direction when applying the Mod Podge to ensure a uniform application. Keep in mind that you will need to apply more than one coat of Mod Podge, so be sure to apply thin coats. The more coats of Mod Podge you apply, the glitterier your heels will be. In this example, three coats of Mod Podge were enough to create the perfect glitter look.
If you’d like to only cover a section of your heels with glitter, you can use painter’s tape to section you heels off. Make sure to remove the tape before the Mod Podge has dried.
Studded wedges
You will need:
A pair of wedges (or heels)
Embellishment glue $6
Metal studs $5
Tweezers
Workspace
The patience of the gods
Total cost: $11
If you’d to add a touch of edge to your holiday outfit, studded wedges or heels are a great addition. There are many different styles of studded wedges, and the great thing about DIY is you can pick the style you like or mix and match different styles.
In the first attempt of this DIY, Elmers Craft Bond was the attempted medium used to secure the studs to the wedges. However, this Craft Bond was not thick enough to create a bond between the leather of the wedges and the metal of the studs.
The second attempt was much more successful. Instead of using Craft Bond, Beacon Dazzle Tac was used. This Dazzle Tac goes on clear and once totally cured, is not very noticeable. This can be purchased at Walmart.
Acquiring the studs for this project required a trip to Michaels, luckily, they were on sale.
Before applying the glue to your wedges, make sure you’ve thought about how you’d like to place your studs. Once the glue goes on, it dries relatively quickly, so you have to be fast.
For this project, a line of glue was drawn down the middle back of the wedges and a row of large studs was applied. If you’d like a minimalist look, only applying one row of studs gives a streamlined but edgy look. If you’re feeling a little more edgy, framing the row of large studs with two shorter rows of small studs gives the perfect touch of edge, without going overboard.
With the stress of final projects and exams piling on, carving out some time to DIY is a great way to relieve the stress. Put on your favourite Christmas movie, pour yourself a glass of wine and get crafty.