

Frugal fashionista: Dressing for a holiday party
 CREDIT: LISA KELLY
Save your money. These do-it-yourself options will go perfectly with the little black dress you already have in your closet. No need for any extra shopping this holiday season.
There’s no set formula to dressing for a holiday party, but the main element for any holiday outfit is sparkle. Some fashionistas may choose to go all out, with a dress made of sparkles and sequins. But from past experience – and many tiny battle wounds – you’ll be more comfortable wearing a soft material dress and add in your sparkle elements with accessories and a glittery manicure. If you’re planning on getting really glitzy with your accessories, wearing a basic little black dress creates a great contrast to your sparkle.
For fashionistas on a budget, buying new accessories or going to the salon to get a manicure may not be possible, however, you can easily DIY your own necklace and manicure for under ten dollars.
Here’s how to do it:
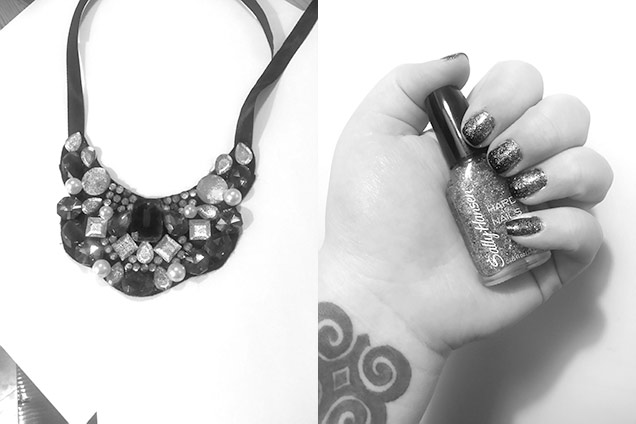
DIY statement necklace
You will need:
Felt $1
Ribbon $1
Gemstones $2 (you can also repurpose old jewellery)
Chalk
Hot glue gun
Nimble fingers
Total cost: $4
Step 1: Determine what shape you’d like your statement necklace to be. If you need ideas, Pinterest is a great resource for this, or you can trace the outline of a statement necklace you already own. Once you have chosen a shape, use your chalk to create an outline. Fold the felt in half before cutting to ensure that your statement necklace is even.
Step 2: Once you have cut out your felt shape, it is time to pick a design for your gemstones. It is recommended to plan the layout of your gemstones before you start gluing to avoid possible mishaps. You can choose a parallel design, or something totally random; that’s the beauty of a statement necklace.
Step 3: Once you have chosen a design, you can start gluing your gemstones. Be prepared to glue your fingers at least a couple times. Just remember, burnt fingertips are well worth the pain for a $4 statement necklace!
Step 4: To complete your statement necklace, cut two equal pieces of ribbon for the ends of your necklace. Attach the ribbon to the top corner of your felt, and voila, you have a statement necklace. If you want to get fancy, you can also attach metal clasps to the end of your ribbon for easy wear. You can buy the metal clasps at Dollarama, or your local craft store.
Your DIY statement necklace also makes for a great DIY Christmas present.
Easy DIY Glitter Manicure
You will need:
Base coat
Black nail polish (Wet’n’Wild Black Crème) $2
Glitter Nail Polish (Wet’n’Wild Sparked) $1
Glitter nail polish (Sally Hanson Ice Queen) $1
Top coat
Total cost: $4
Step 1: Apply a basecoat. In this example, a coat of white nail polish was used. Allow for time to dry.
Step 2: Apply a thin coat of black nail polish. As you are going to be layering glitter polish, you do not want to apply the polish too thick, or it will take an extremely long time to cure. Allow for time to dry.
Step 3: Apply a thin coat of red or pink glitter polish to three quarters of the nail. Allow for time to dry.
Step 4: Apply a thin coat of silver/ blue nail glitter polish directly overtop the red glitter polish. It is best if the glitter is not as fine as the bottom coat. Continue to repeat steps 3 and 4 until the desired glitter look has been achieved.
Step 5: Seal with a top coat. To create a cool, subdued look, try using a matte topcoat.
Buy creating your own accessories you can free up money for eggnog, and when someone compliments you on your wonderful accessories you can say, “Thanks, I made that.”