


Frugal Fashionista makes: DIY Fringe Bag
 CREDIT: LISA KELLY
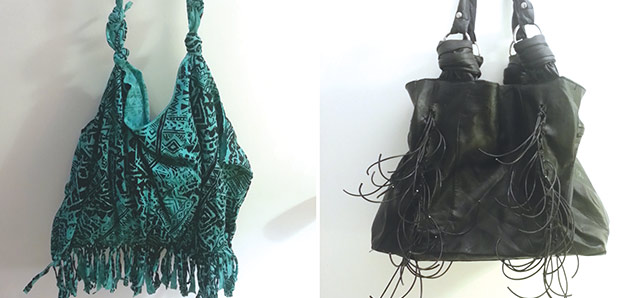
Two easy DIYs for the most frugal of fashionistas. Which one will you try?
Fringe lovers rejoice. Fringe bags are back on the scene this season, and we couldn’t be happier. If you’re not a bag hoarder – don’t judge – dropping $40 to $50 on a new fringe bag that will ultimately go out of season may not be the best choice for fellow frugal fashionistas.
Fringe comes in many different styles. Here are two DIY methods to create the perfect fringe bag for the season.
DIY perma fringe
You will need:
• A leather/pleather purser – any type
• Leather cord $10
• Ruler
• White marker
• Scissors
• Leather hole punch – preferred
Total cost: $10
This DIY will be permanent, so make sure to pick a bag you won’t be sad to put a few holes in. It is strongly recommended to use a leather hole punch for this project since it’s much safer, and the holes will be uniform size and shape. However, if you do not have a leather hole punch readily accessible, scissors or a nail and mallet will suffice. If you choose this route, be careful. Fringe bags may be wonderful, but they’re definitely not worth a trip to the hospital – unless you’re hoping to run into a hot doctor while you’re there.
Begin by turning your bag inside out. If the bag has a lining, cut it out. It will be next to impossible to punch holes in the leather with a lining. Once you’ve decided which direction you want your fringe, use the ruler to draw a straight line. Use this line to punch your holes. Once you have your holes punched, turn the bag right side out. You can use any length of leather cord you like. In this example 12-inch cord was used.
Loop and knot the cord through the hole. Depending on the type of leather cord you’ve purchased, the cord may be curly. Just leave a textbook on top of the bag for a few days to flatten it out. That $120 textbook was totally worth it.
DIY T-shirt fringe bag
You will need:
• Old T-shirt
• Scissors
• Ruler
Total cost: $0
Do you have an old T-shirt or tank top lying around that you don’t wear anymore? This is a great way to revive an old shirt that’s past its prime. This is a basic no sew, DIY that can easily be funked up.
Begin by cutting the bottom trim off of the T-shirt. The more you take off the bottom, the smaller the bag will be. Save the scrap piece of T-shirt for later – you’ll be using it to make a strap. Then cut off the sleeves and the trim around the neckline. Then cut six-inch strips along the bottom of the shirt and be sure to pull the cut strips downward to create a longer fringe. Tie the matching pieces together in a double knot. When you are finished tying the strips together, the bottom of the bag will be scrunched – gently stretch it back to regular size. Now loop each armhole into a knot, leaving a small loop at the top to weave the strap through. Cut the scrap from the bottom of your T-shirt into three strips and braid them. Loop them through the armhole and voilà – you’ve made a fringe bag.
With two different styles of fringe bags to create, your wardrobe will be fringe-tastic.