

Frugal Fashionista: What's better than a DIY?
 CREDIT: LISA KELLY
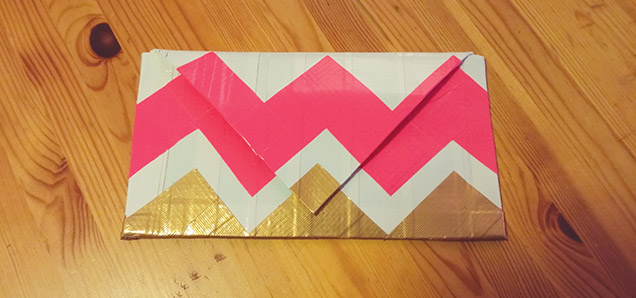
Who knew duct tape could be so versatile? Follow these steps and you'll be putting finishing touches on your own clutch soon.
Have you ever thought to admire the wonders of duct tape? You can make jewelry with it, endless cosplay items and even fashion accessories, all of which last forever. Duct tape items are practically indestructible. The best part? Duct tape only costs five dollars per roll. For five dollars you have endless possibilities of creation. Duct tape is literally the Lego of sticky adhesive. If you can dream it, you can create it.
With spring finally making an appearance, it’s time to trade in the boring black purses and clutches for pretty spring colours. However, if you’re on a budget, purchasing a new spring clutch isn’t exactly realistic. Don’t fret, frugal fashionistas, you can easily add a new envelope clutch to your wardrobe with a simple DIY project. This project takes about 30 minutes and costs less than $20.
You will need:
- Two rolls of duct tape (minimum) – $10
- Velcro – $1
- Scissors
- Straight edge
- Ruler
- Pencil
- Paper (any kind) 12 in. by 18 in.
OR
- Pizza box cut to 12 in. by 18 in. dimensions
Step one
If you are using a sheet of paper as your base, fold the sheet into thirds. You’ll want to make the front flap slightly shorter. To make the clutch stronger, you can use a cardboard pizza box as a base instead. Unless you have extralarge pizza boxes lying around your house – no judgement – you will probably need to cut three pieces of cardboard and tape them together. In that case, be sure to cut a larger piece for the front flap to avoid losing length when taping the cardboard pieces together.
Step two
Once you have folded the paper into thirds or taped the cardboard pieces together, you will need to locate the center point on the front flap. Mark the center point and then use scissors to trim the flap into a triangle shape. This will create the envelope look.
Step three
Unfold the paper or cardboard and place it so the outside is facing up. Then, using the lightest shade, cover the paper or cardboard with vertical strips of duct tape. Leave approximately a one-inch overhang of duct tape, and once you are finished covering the paper or cardboard, flip it over and fold the duct tape over to create a border.
Step four
Fold the taped paper or cardboard back into thirds, and use the same shade of tape to seal the edges.
Step five
Using your ruler, mark out a row of dots that are two inches high and four inches apart from each other. Then use another colour of duct tape to connect the dots. This will create a chevron pattern. Don’t stress over getting the tape to match up exactly – you can easily trim any excess tape with the straight edge.
Step six
Leave one to two inches of space from the bottom chevron row, and then follow step five again to create another chevron row. You can use the same colour as the first chevron row, or you can switch it up. Don’t be afraid to mix and match.
Step seven
Fold the front flap over and follow step five again. Be sure to line the chevrons up with the row below to give the illusion of a consistent pattern.
Step eight
Add the Velcro closure, and you’re done.
You can carry the chevron pattern over to the backside of the clutch, or you can choose to leave it plain – dealer’s choice. Now go forth and create a duct tape clutch that would make Red Green proud.