

DIY Christmas cards
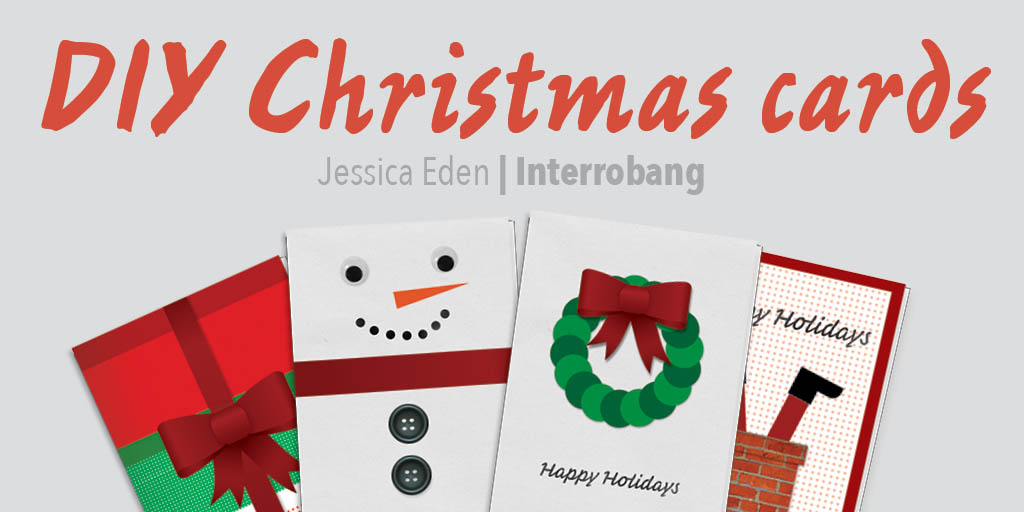
What better way to show off your (perhaps non-existent) art and creativity skills by making a handmade Christmas card. Don't worry if you're not that artistically inclined, we've included detailed instructions on how to make some easy, yet professional-looking Christmas cards for your friends and family this season. For extra ideas, check out pinterest.com.
Festive Wreath
You will need: One piece of white or light brown cardstock, one piece of dark green card stock, one piece of light green card stock, red ribbon, craft glue and a black pen. Start by folding the white or light brown piece of card stock in half. This will be what you use as the base of the card. Use the ruler to measure squares on the light and dark green cardstock that are equal in size. Cut out squares, rounding the edges. Arrange squares in a circle, overlapping each other, at the upper section of the card to leave room for writing underneath. Glue the squares onto card. Cut off a length of ribbon that will allow you to tie a bow. Glue the bow at the top of the wreath. Write or stamp your chosen greeting at the bottom of the card with the black pen.�
Smiley Snowman
You will need: One piece of white cardstock, two black buttons, two googly eyes, orange paper, craft glue, a black thin tip pen and ribbon of your choice that will be the snowman's scarf. Start by folding the white piece of card stock in half. This will be what you use as the base of the card. Glue a piece of ribbon horizontally from one side to the other side on the card just slightly above halfway down the card. Centre the two buttons one underneath the other below the ribbon and glue to the card. Cut an isosceles triangle from the orange paper for the snowman's carrot nose and centre between the ribbon and the top of the card. Arrange the googly eyes above the nose and draw a squiggly smile underneath the nose with the black pen. Glue the nose and googly eyes to the card.
Here comes Santa Claus
You will need: One piece each of red, black and white cardstock, one piece of Christmas colour themed patterned paper, one piece of brick patterned paper and craft glue. Start by folding the red piece of cardstock in half. This will be what you will use as the base of the card. Cut a rectangle out of the Christmas colour themed patterned paper with slightly smaller dimensions than the front of the red card. Glue onto the red card so that the red paper frames the patterned paper. Cut two rectangles out of the red paper that are equal in length for Santa's legs that will poke upside down and diagonally from the chimney. Cut out boots from the black paper that align with the pants in width. Using a hole punch, punch some circles out of the white paper. Glue the white circles to one side of the smaller edge of both red rectangles. Cut out two rectangles from the brick patterned paper, one wide enough to be the base of the chimney and the other to go on top perpendicularly as the top of the chimney. Glue in this form so that the chimney is at the bottom of the page and centred in the middle. Before the glue is dry, slip the red rectangles underneath the chimney to create a “V” shape from the top of the chimney with the white circles visible. Glue the black boots on facing outward and upside-down. It should look like Santa is going head-first down the chimney with his feet poking out the top.�
Pile of Presents
You will need: One piece of red cardstock, two or three different patterned cardstock with red/green colour schemes, one piece of plain white cardstock, green ribbon, craft glue and a thin tip pen (either red, green or black). Start by folding the red piece of cardstock in half. This will be what you will use as the base of the card. Cut out three different shaped rectangles from the patterned cardstock. Use the white cardstock to glue a thin strip of paper to the longest edge of two largest rectangles to make it look like the box has a lid. Arrange and glue the rectangles on the card so that at the bottom is the largest and at the top is the smallest. Cut a piece of ribbon that spans the length of all the boxes from top to bottom and stick vertically in the middle of the boxes. Cut a rectangle from the white card stock to be the tag on the top of the presents. Write a greeting on the tag with the thin tip pen. Glue tag in a diagonal position at the top of the stack of presents. Cut a piece of ribbon long enough to create a bow. Glue bow on the top of the stack of presents.